February 10, 2004
System diagram
Posted by vanevery at 03:44 PM | Comments (11) | TrackBack
February 11, 2004
Software Applications
First up are the applications that run on the portable broadcasting unit:
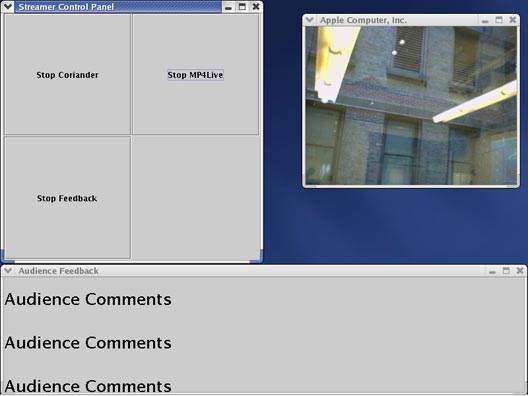
In the above image you see what is displayed on the touch screen monitor that is mounted on the steady cam and is running on the portable streaming computer. On the top left there is a button panel that enables quick launching of the various applications required: MP4Live for streaming, Corriander for camera capture and last an application for viewing the audience feedback. The video window appears on the right and acts as a viewfinder for the tele-journalist. On the bottom is the application that displays the audience comments.
Next is the in-studio stream/chat reception and rebroadcasting application:
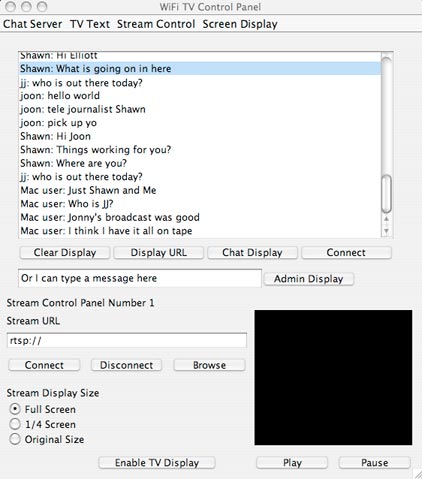
The top portion of this application allows the studio staff to monitor the audience chat and gives them the ability to select messages for display on TV. The bottom portion of the application allows them to select a tele-journalist stream (or live in-studio camera) and switch between feeds.
Here is an example of the television output of the above application:
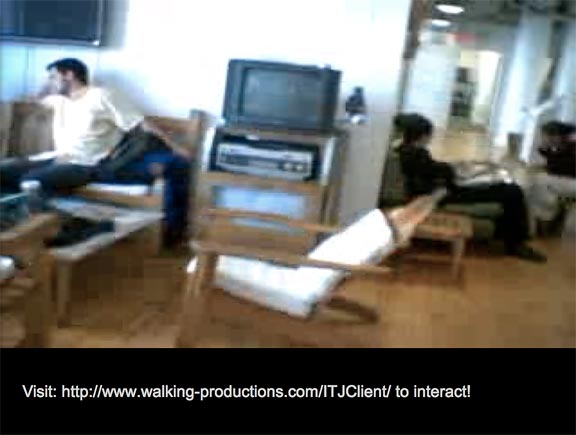
The chat messages from the audience appear at the bottom of the screen and the feed from the tele-journalist takes up the rest.
Last is an image of the simple application that audience uses to interact with each other and the tele-journalist:
I often leave this application running and you can try it out for yourself
Posted by vanevery at 03:44 AM | TrackBack
May 03, 2004
Building a portable, low cost, live television acquisition system for interactive TV production.
The purpose of the following is two-fold; the primary reason is for the appendix of my thesis project, Interactive Tele-Journalism (more information about the project can be found at ITJ's main site. The other reason, perhaps more important, is that I am interested in helping others to get started in the building of low cost and open sourced interactive television production tools. I feel that television needs a nudge in the right direction and that the social nature and power of the internet should be brought to it in the form of small scale community orientated interactive programming.
With that said, let's get started.
In a nutshell, you will need a cheap but powerful single board computer, some RAM, a Firewire/IEEE 1394 camera, a small touch screen monitor, a battery, a hard drive and a WiFi card. Next you will need to install Linux, add in some video capture, encoding and streaming software and your ready to go.
Almost...
Ok ok, so it isn't really that easy.
What follows is a description of the system I built along with information on how I built it and the problems I ran into along the way.
This project started about 6 months ago with the purchase of a Via EPIA M10000 motherboard. I chose the Via EPIA M10000 because several friends have had good experience with them and it seemed an especially nice single board computer with good support for Linux and great extras. It has a plethora of ports including 2 Firewire/IEEE 1394 ports, 4 USB ports, S-Video and composite video out as well as all of the standards such as VGA, parallel, serial, audio in/out/microphone, PS2, PCI and even I2C. This board is also very quiet, small (17 cm by 17 cm), low power (less than 5 amps) and sports a speedy 1 GHz x86 compatible processor. The unfortunate thing about starting with a board like this is that you have to purchase and install everything else and I mean EVERYTHING ELSE.
My next task was to pickup and install RAM. This was pretty straight-forward. The Via board takes DDR PC-2100 RAM, which is pretty easy to find and not all that expensive. I bought a 256 MB module from Crucial and snapped it into place.
Following that, I dug out a 10 GB laptop hard drive that I wasn't using anymore. Using a laptop hard drive was necessary for this application since I needed enough space for video files and didn't want to lug around a full size hard drive and the means to power one. Some ambitious folks might want to try a Compact Flash card and IDE adapter but it could be cost prohibitive due to the amount of space required by video files. For me using a laptop hard drive was a good compromise between space, cost and power.
Unfortunately, the Via board only comes with IDE cable and pin-outs for a full size (3.5") drive so I had to purchase a 40-Pin to 44-Pin Laptop IDE cable adapter. This adapter fits in the standard IDE pins (40) on the motherboard and has a separate section that plugs into an output from the power supply and provides a 44-pin connector for a laptop drive, which includes power.
Next I needed to provide power to the board. Since this system was meant to be portable and I didn't intend to carry around an AC generator, I needed to find a means to provide power other than a standard ATX power supply. After a bit of searching around, I came upon a very nice 12 volt DC to 12 volt DC board that fit right into the power connectors available on the board. This allowed me the option of powering the board with a 12 volt battery or plugging it in, assuming I had an AC adapter that output 12 volts DC.
If there is one thing I learned and learned well, it is that this board requires more juice than can be gotten from your standard 12 volt 1.5 amp AC to DC adapter from RadioShack. For this board, assuming you will want to run it without a battery at points, you will need at least a 5 amp AC to 12 volt DC adapter. Luckily, digging through a box of unused goodies at school I was able to find a suitable adapter that came from an old flat panel display. Unfortunately along the way I learned some valuable lessons regarding polarity, fuses and the fact that ATX power supplies only work correctly with a load.
Having an AC to DC adapter was all well and good but I needed this to be portable, usable on the run, almost wearable, which means I needed battery power. During the course of my research I came across several battery types that seemed as though they would do the trick. Here is a short run-down: Motorcycle and car batteries provide plenty of power and the right voltage but are far too heavy for a portable system. Several different laptop batteries looked as though they would do the trick but would require a laptop to charge them back up, not to mention their high cost. Finally I settled on using a lead-acid battery made by Bescor that is meant to power portable lighting kits for video production. The one I choose is fairly light, low cost and provides a good amount of amp hours, unfortunately it takes an extremely long amount of time to charge (15 hours).
The need for portability raised a couple of other problems: the need for a portable display and the difficulty of using a mouse while walking around. Solutions for these issues were pretty forthcoming after finding a couple of forums that "carputer" enthusiasts frequent. There are a couple of touch-screen LCD manufacturers and dealers that supply this community. One that seemed to stand out in the forums at MP3Car.com was a series of touch-screen LCDs from a company called Lilliput. I chose to purchase a fairly bright 7 inch model that was rumored to have Linux support for its USB based touch component. Just in case, I also picked up a Cirque PS2 touch-pad to use in-place of the mouse should the touch-screen give me issues.
A couple of other purchases rounded out the shopping. I picked up a single PCI to dual PCI right angle adapter as I didn't want to have to build a case tall enough to fit my next acquisition, which was the borrowing of a friendís 802.11b WiFi card. Unfortunately, settling on this card was quite a task. My original instincts were to go with an 802.11g PCI card that sported a chip set that had Linux support. The problem was that the Linux driver turned out to be just a tad bit immature and didn't quite work as I had hoped. After struggling with this card for some time I choose to try a PCI 802.11b card but had similar driver problems. Finally, going with a tried and true card such as the Netgear 802.11b PCI card turned out to be the right choice under Linux.
Last but not least, I needed some means for sound and video input as this was meant to be a live video acquisition and streaming system. For cost reasons I choose to use an Apple iSight camera that I already owned. The iSight is a fairly standard IIDC camera, meaning that it supplies a 640x480 8 bit uncompressed video stream over IEEE 1394/Firewire. There are quite a few IIDC compatible cameras on the market with a range of quality and capabilities, visit the IEEE1394 Digital Camera List for a pretty comprehensive run-down.
For sound I picked up a cheap headphone microphone combo. I won't go into detail on this since I feel as though what I have isn't an ideal solution but it is good enough for demonstration purposes until I pickup a good microphone or two. One of the criteria that this did fill is that this setup gave me separate stereo mini plugs for the headphones and microphone which differentiates this from headset/microphone combos typically sold for phone usage. A cautionary note here: most of the headphone/microphone combos out there are sold for use with phones and these typically provide a single 2.5 mm connector which will not work with a standard stereo mini plug on a computer.
Here is a run down of the equipment purchased, how much it cost (or should cost) and in some cases where I purchased it:
Total cost: ~$1000.00 - Far less than a laptop with all of the necessary extras
Notes:
It should be noted that many of the key and hard to find components listed above can be purchased through the iTuner Yahoo store and Mini-ITX.com store.
For more information on "carputers" visit the forums at MP3Car.com.
For more information on IIDC Cameras visit the IEEE1394 Digital Camera List.
Last but not least Mini-ITX.com is a great source for more information on many things related to building small computers; they offer reviews, more articles such as this one and an online store.
The next step was to identify, build and install Linux along with the rest of the required software.
Since I had been a RedHat user the obvious choice for my first experiments was a standard RedHat 9 install. Unfortunately this turned out to have benefits (some precompiled drivers for the Via) but also gave me some issues (not having the latest kernel modules installed). After trying Fedora Core 1, the latest Debian and several custom kernel compiles I came up with the following instructions.
Disclaimer: these are the steps that worked for me using the hardware listed above. This is no guarantee that these steps as written will work in your particular situation, but they should be similar.
Installing Linux
Start with a stock RedHat 9 Workstation install with some minor package additions and subtractions. You will need to make sure you have XFree86, Gnome, kernel source, development and compilation tools installed. If you have no idea what I am talking about, follow the instructions on RedHat.com for downloading and installing or go to your local computer or book store and purchase the installation CDs with a printed manual.
Doing a couple of additional things is a good idea before we proceed to kernel compiling. One is to register with the RedHat Network via the website as this will allow you to use RedHat's up2date application for automatic installation of updates. It also helps to have wired ethernet plugged in and be using DHCP on your network so as to reduce setup pain. (Note: Since RedHat 9 has reached end of life, this might not do you much good but I could be wrong.) Also, make sure you download and install the latest up2date and up2date-gnome packages from RedHat as the ones that come with RedHat 9 do not work anymore. Next, go ahead and update most packages that need it but leave the kernel and XFree86 updates out for now. The kernel we are going to build ourselves and I have had trouble with the touch screen drivers with more recent versions of XFree86.
A New Kernel
First, visit kernel.org and download the source of version 2.4.25 or the latest stable 2.4 kernel.
Next, read the instructions for compiling and installing a new kernel given in the readme file. This must be stressed, things will not work correctly if you do not follow the instructions carefully and you may need to start over if you do something wrong. Copying the i686 kernel compilation configuration file from the RedHat supplied kernel source helps with the setup of the standard modules and gives you the base capabilities of the RedHat kernel so go ahead and do that.
In the configuration step of the instructions you will need to enable a couple of additional modules. Make sure that those required for wireless ethernet, video4linux and firewire/ieee 1394 are enabled. (A more detailed list will be added soon.) Furthermore, if you are going to try out the Prism54 drivers for your 802.11g wireless card, make sure that the required firmware modules are enabled. (There may be other requirements for this module but I am not aware of them.)
Although the instructions do not specify this, running "make install" after compiling everything puts most things in the right place so go for it (you will probably have to be root at this point). To reboot the computer and use this new kernel you will have to do a couple of additional things. Assuming you are using the grub boot loader, edit /boot/grub/menu.1st and make the kernel you just compiled the default (0). Also, as root, copy the source to the /usr/src directory (cp -r linux-2.4.x to /usr/src/.) This helps with compilation of later software. Finally, fix the default symbolic links in the /usr/src directory to point to the new kernel source. Again, this helps with the compilation of later software.
Now you can go ahead and reboot the computer to make sure that everything works as it should. If it doesn't, read the instructions again, read this over again, tell me what I told you to do that was wrong and try again. Unfortunately, it took me quite a few attempts with various Linux distributions to get this right and working correctly for me. If it works, do a backup...! I can not stress this enough, DO A BACKUP!
If this is all a bit scary or too much effort (it does take several hours and a bit of Linux know-how), I suggest stopping now and taking a look at dyne:bolic which appears to be a very nice Linux distribution on a single CD that "is shaped on the needs of media activists, artists and creatives ...". More information can be found at: dynebolic.org. If you do this, let me know how it goes, I intend to give dyne:bolic a shot once I have a bit more time.
Hardware Drivers
Touch-screen
The Lilliput that I used has a touch screen that reports itself as manufactured by a company called eGalax. Fortunately, eGalax seems to be good about supplying Linux drivers and they have them available for download on their website.
To unpack the driver from eGalax, you will need to obtain and install the shareutils rpm package which is also available via the eGalax website. (rpm -i sharutils-x.rpm) It is possible that you already have the sharutils package installed, if this is the case you can skip this step. Next run the touchkit setup script to compile and install the driver. Make sure you run this as root (./touchkit.setupr8nm.sh) and hope that everything goes as it should. You will need to fully restart the machine in order to tell if the drivers are working correctly. If the touch screen does not work, take a look at the source, it should have been extracted in your tmp directory, go through the script and makefiles to see if there is anything you can do about it. With a stock RedHat 9 install, this script works fine. With most other distributions I needed to edit and fiddle a bit to make it work.
Firewire camera and control application
Fortunately there is a great open source application by Damien Douxchamps called Coriander. Coriander is a GUI for IIDC compliant cameras (see above) which includes camera control, video display, capture and a live video4linux export module. Although there is a package available for download off of SourceForge things didn't quite work as they should have on RedHat. Getting the latest version off of the CVS (read the instructions for doing this on SourceForge) everything cleared up. I am using the pre-release of version 1.0.
Coriander has a couple of requirements; the first is the latest version of libdc1394, which contains the actual libraries for controlling the IIDC camera. You will need to get the latest version of this from the SourceForge CVS as it is closely related to the Coriander project and Coriander will probably not work with an earlier version. Next you will need to download and install the latest versions of libraw1394 and libraw1394 development packages from RedHat (running 'rpm -Fv libraw1394' and 'rpm -Fv libraw1394-dev' should do the trick for installing them). Last you will need to get the vloopback driver installed. Unfortunately, this driver is pretty much unsupported and is just an add-on to the Motion project, it can be found at http://motion.sourceforge.net/vloopback/. I downloaded the latest version (0.91) which unfortunately doesn't compile on RedHat. After quite a bit of searching around I came upon a patch via this message. Before applying the patch, I renamed it to vloopback-0.91-redhat9-kernel-2.4.20-x.diff and used diff to apply it to vloopback.c (run 'man diff' for more information). Fortunately, it compiled after doing such.
After compiling and installing all of these components you are ready to compile and install Coriander. Assuming that went alright and you now want to run it you will have to install the modules into the running kernel or Coriander will complain and refuse to run. Issuing the following commands should do the trick: 'modprobe ieee1394 raw1394 ohci1394 video1394' followed by 'insmod videodev' and 'insmod vloopback'. It is a good idea to include those commands in /etc/rc.local so that you don't need to issue them every time you restart. Assuming all of that worked you should be able to run Coriander (make sure the camera is plugged in as well).
Audio
Next on our list of drivers that are necessary is the audio driver for the Via's onboard sound card. While these drivers are supposed to be enabled in the stock RedHat install, I found that they weren't and therefore this step was required. It is possible that I missed something in the RedHat install that you won't miss and they will just work. In any case, this is probably the easiest step so far, simply download the driver package from Via and follow the nice instructions on the audio section of the EPIA HOWTO for linux site. Incidentally the EPIA HOWTO site is a great resource and has fantastic information on configuring and installing Linux with the appropriate optimizations for the Via boards.
WiFi drivers
So having a portable system is all well and good but we need network connectivity as well. Thankfully projects such as linux-wlan project exist and that makes our lives much easier. Unfortunately, many PCI WiFi cards are unsupported and for the time being we will just have to deal. A good run-down of cards supported by the linux-wlan project can be found at http://www.linux-wlan.org/docs/wlan_adapters.html.gz but be careful, just because a card is listed doesn't mean that it is supported; only cards that list "Linux-wlan-ng" in the "Linux Support" column are supported. Also, be sure to look at the notes carefully, I purchased a D-Link DWL-520 expecting a standard Prism chipset but alas I had Rev. E which is a newer Prism3 chipset, unfortunately this did not work out very well.
If you are a brave person and want to get all of the speed you can checkout the Prism54 driver project. I tried an SMC Wireless EZ Connect G PCI card (SMC2802W) but was not able to get it to work with the Prism54 drivers although it has a chipset that is supported (the support matrix on the Prism54.org site states that they have a 44% success rate with this card).
Finally, I got some brains and asked a friend who knows these things and he lent me a very nice and well supported Netgear 802.11b card (MA311). Fortunately, this card gave me very little trouble and after reading the instructions given on the Quick HOWTO: Linux Wireless Networking page I was able to use it without trouble. Unfortunately, there aren't any graphical clients that I know of that allow the easy switching of wireless networks using the linux-wlan drivers so I am stuck for now with the default settings unless I pull out the keyboard and reconfigure.
Video capture, encoding and streaming software
MPEG4IP
MPEG4IP is a very nice MPEG-4 encoding and streaming package developed by a couple of people at Cisco. It was fairly painless to compile and install once I downloaded, compiled and installed its prerequisites, which are lame and faac. Lame is available from SourceForge. Faac is available from AudioCoding.com. Both were easy compilations and installed without a hitch with the standard ë./configureí, ëmakeí and ëmake installí commands (be careful and read the instructions anyway).
Now that all of the software is installed the next steps are to build a case and other means to make this a portable system.
TO BE CONTINUED
Posted by vanevery at 11:26 AM | Comments (4) | TrackBack
May 28, 2004
The Tele-Journalist
Here are some shots of TJ Jonny using the tele-journalist system to interview some people:
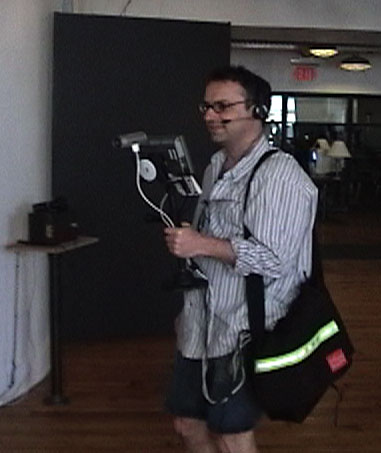
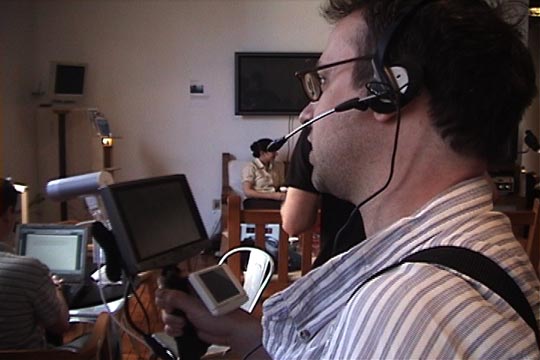
In this image, Jonny is carrying the portable streaming computer in a messenger bag and holding the steady cam rig with camera and touch-screen.
This is a closer image of the same:
Posted by vanevery at 02:53 AM | Comments (1) | TrackBack